Создание аккордеона

Сегодня мы делаем простой, но привлекательный аккордеон с
помощью CSS, JQuery и ослабления плагина для некоторых необычных эффектов.
ДЕМО СКАЧАТЬ
Шаг 1 - XHTML
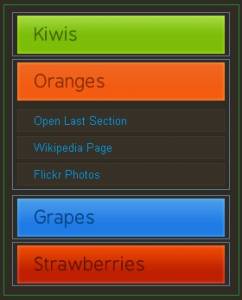
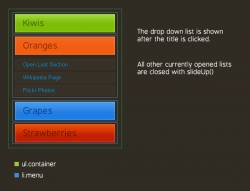
Как вы можете видеть из демо-версии, аккордеон делится на
четыре секции, каждая определяется LI элементом с именем класса меню . Они
расположены в главном неупорядоченном списке ( ul.container )
и имеют общую структуру HTML:
demo.html
|
<li
class="menu"> <!-- This LI is positioned inside the main UL
-->
<ul> <!--
This UL holds the section title and content
-->
<!-- The
click-able section title with a unique background: -->
<li
class="button"><a href="#"
class="green">Kiwis
<span></span></a></li>
<!-- The dropdown
list, hidden by default and shown on title click: -->
<li
class="dropdown">
<ul> <!--
This list holds the options that are slid down by jQuery -->
<!-- Each option
is in its own LI -->
<li><a
href="http://en.wikipedia.org/wiki/Kiwifruit">Read on
Wikipedia</a></li>
<li><a
href="http://www.flickr.com/search/?w=all&q=kiwi&m=text">Flickr
Stream</a></li>
</ul> <!--
Closing the elements -->
</li>
</ul>
</li>
|
Каждое меню содержит другой UL, который образует зону
название ( li.button ) и место для контента ( li.dropdown ).
Элемент привязки, расположен внутри li.button.
Эта гиперссылка позже свяжется с обработчиком событий JQuery, которая скользить
вниз со списком, когда нажмете ссылку. Стоит также отметить, что выпадающие элементы
списка по умолчанию.

Шаг 2 - CSS
Важно чтобы код CSS хорошо работал в различных
браузерах. Я включил все стили, используемые в приведенной ниже демо:
файле demo.css - часть 1
|
body{
/* Setting default text color, background
and a font stack */
color:#cccccc;
font-size:13px;
background: #302b23;
font-family:Arial, Helvetica, sans-serif;
}
ul{
margin:0;
padding:0;
}
ul.container{
/* The main UL */
width:240px;
margin:0 auto;
padding:50px;
}
li{
list-style:none;
text-align:left;
}
li.menu{
/* The main list elements */
padding:5px 0;
width:100%;
}
li.button a{
/* The section titles */
display:block;
font-family:BPreplay,Arial,Helvetica,sans-serif;
font-size:21px;
height:34px;
overflow:hidden;
padding:10px 20px 0;
position:relative;
width:200px;
}
|
Здесь стиль главный UL - ul.container ,
который держит остальные элементы. Теперь, мы определяем внешний вид
гиперссылок, которые действуют как названия разделов (обратите внимание, что
фактические фоновые изображения еще не назначены).
файле demo.css - часть 2
|
li.button a:hover{
/* Removing the inherited underline from
the titles */
text-decoration:none;
}
li.button a span{
/* This span acts as the right part of
the section's background */
height:44px;
position:absolute;
right:0;
top:0;
width:4px;
display:block;
}
/* Setting up
different styles for each section color */
li.button a.blue{background:url(img/blue.png)
repeat-x top left; color:#074384;}
li.button a.blue
span{ background:url(img/blue.png) repeat-x top right;}
li.button
a.green{background:url(img/green.png) repeat-x top left; color:#436800;}
li.button a.green
span{ background:url(img/green.png) repeat-x top right;}
li.button
a.orange{background:url(img/orange.png) repeat-x top left; color:#882e02;}
li.button a.orange
span{ background:url(img/orange.png) repeat-x top right;}
li.button
a.red{background:url(img/red.png) repeat-x top left; color:#641603;}
li.button a.red
span{ background:url(img/red.png) repeat-x top right;}
/* The hover effects
*/
li.button a:hover{
background-position:bottom left;}
li.button a:hover
span{ background-position:bottom right;}
.dropdown{
/* The expandable lists */
display:none;
padding-top:5px;
width:100%;
}
.dropdown li{
/* Each element in the expandable list */
background-color:#373128;
border:1px solid #40392C;
color:#CCCCCC;
margin:5px 0;
padding:4px 18px;
}
|
Самая интересная часть мы определяем индивидуальную фоновую
собственность для каждого раздела. Мы
также предоставляем фон для пролета элемента.

Шаг 3 - JQuery
Сначала мы должны включать несколько сценариев на странице
(этот код помещается внутри головной части документа):
|
<script
type="text/javascript"
src="http://ajax.googleapis.com/ajax/libs/jquery/1.3.2/jquery.min.js"></script>
<script
type="text/javascript"
src="jquery.easing.1.3.js"></script>
<script
type="text/javascript" src="script.js"></script>
|
Как вы могли заметить, из демо-версии, эффект не обычное
линейное движение, но более сильный удар, как и живой. Это достигается с
помощью ослабления плагина для JQuery.
script.js
|
$(document).ready(function(){
/* This code is executed after the DOM
has been completely loaded */
/* Changing thedefault easing effect -
will affect the slideUp/slideDown methods: */
$.easing.def = "easeOutBounce";
/* Binding a click event handler to the
links: */
$('li.button a').click(function(e){
/* Finding the drop down list that
corresponds to the current section: */
var dropDown =
$(this).parent().next();
/* Closing all other drop down
sections, except the current one */
$('.dropdown').not(dropDown).slideUp('slow');
dropDown.slideToggle('slow');
/* Preventing the default event
(which would be to navigate the browser to the link's address) */
e.preventDefault();
})
});
|
Мы сначала должны установить метод ослабления, который будет
использоваться по slideUp / slideDown эффектов, а
затем связывать специально созданной функцией щелчка li.button по гиперссылке. При
нажатии на эту ссылку, мы получаем соответствующий эффект li.dropDown
показывая его, скрывая все остальные.

ДЕМО СКАЧАТЬ
Источник
|