Создание IOS, сенсорный
экран с CoffeeScript

Сегодня мы собираемся создать IOS, для главной страницы
используется CoffeeScript - новый язык, основанный на JavaScript и JQuery
библиотеки. CoffeScript имеет чистый синтаксис, который находится где-то
между Руби и Python. Если вы не использовали ни одного из них, не
волнуйтесь - это не требуется.Однако вы должны быть знакомы с JavaScript, чтобы
вы могли лучше понять концепции, лежащие в языке.
ДЕМО СКАЧАТЬ
HTML
Давайте начнем с HTML разметки нашего IOS. Как обычно,
это обычный документ с HTML5.
index.html
<!DOCTYPE html>
<html>
<head>
<meta charset="utf-8" />
<title>iOS Home Screen with CoffeeScript | Tutorialzine
Demo</title>
<!-- Our CSS stylesheet file -->
<link rel="stylesheet"
href="assets/css/styles.css" />
<!--[if lt IE 9]>
<script
src="http://html5shiv.googlecode.com/svn/trunk/html5.js"></script>
<![endif]-->
</head>
<body>
<section id="homeScreen">
<div id="mask">
<div id="allScreens">
<!-- The
.screen divs will go here -->
</div>
</div>
<ul id="indicators">
<!-- A LI
element for every screen -->
</ul>
<div id="dock">
<!-- The three
dock icons will go here -->
</div>
</section>
<!-- JavaScript includes -->
<script src="http://code.jquery.com/jquery-1.6.3.min.js"></script>
<script src="assets/js/touchable.js"></script>
<script src="assets/js/coffee-script.js"></script>
<script type="text/coffeescript">
# Our Code Goes Here
</script>
</body>
</html>
У нас есть рабочий стол # раздел, который
является основным контейнером нашего эксперимента.
В нем # маска , которая скрывает часть
стола , чтобы показать только одину экрана.
# AllScreens DIV внутри нее, как следует из названия,
содержит все динамические дивы экрана с
иконками.
Для CoffeeScript
требуется дополнительный шаг компиляции, который преобразует исходный код
JavaScript. Вы можете сделать это с CoffeeScript
пакет для Node.js (как описано на их сайте), или с coffeescript.exe для окон , которое является
автономным и готовым к использованию. Для небольших скриптов, вы можете
также включить компилятор прямо в вашу страницу и написать свой встроенный
код в тег <script> - который мы будем использовать сегодня.
CoffeScript код
Как мы пишем встроенный код, мы не должны скомпилировать его
перед развертыванием веб-страницы.Это очень удобно для небольших веб-страниц и
в процессе разработки. Однако, если вы планируете создавать большие
приложения, было бы лучшей идеей компиляции кода с помощью одного из
инструментов, описанных выше.
Теперь давайте начнем с написания простого класса - иконка .
# The Icon class.
class Icon
# The
constructor. The -> arrow signifies
# a
function definition.
constructor: (@id, @title) ->
#
@ is synonymous for "this". The id and title parameters
# of the constructor are automatically added
as this.id and this.title
#
@markup holds the HTML of the icon. It is
#
transformed to this.markup behind the scenes.
@markup = "<div class='icon'
style='background-image:url(assets/img/icons/#{@id}.png)'
title='#{@title}'></div>"
Объекты этого класса собираются представлять иконки на
главном экране. Каждая иконка имеет разметку свойство,
содержащее HTML код, необходимый для ее отображения.
Теперь давайте определим класс для док значков. Но они очень
похоже на икону, так что мы собираемся расширить его:
# The DockIcon class inherits from Icon
class DockIcon extends Icon
constructor: (id, title)->
#
This calls the constructor if Icon
super(id, title)
#
Changing the class name of the generated HTML
@markup
= @markup.replace("class='icon'","class='dockicon'")
Нам нужно только заменить имя класса.
Мы разделим на главный экран на части, каждая из которых
содержит свой собственный набор иконок. Вот класс, для этого:
# The Screen Class
class Screen
#
Function arguments can have default values
constructor: (icons = [])->
@icons = icons
attachIcons: (icons = [])->
Array.prototype.push.apply(@icons, icons)
generate: ->
markup = []
#
Looping through the @icons array
markup.push(icon.markup) for icon in @icons
#
The last line of every function is implicitly returned
"<div class='screen'>#{markup.join('')}</div>"

Док IOS
Теперь нужен класс, который тянет все вместе, и управляет
переходами между экранами. Вот как он
выглядит:
class Stage
# The
width of our "device" screen. This is
#
basically the width of the #mask div.
screenWidth: 332
constructor: (icons)->
@currentScreen = 0
@screens = []
#
Calculating the number of screens
#
necessary to display all the icons
num = Math.ceil(icons.length / 9)
i
= 0
while
num--
# we pass a slice of the icons array
s = new Screen(icons[i...i+9])
# adding the screen to the local screens array
@screens.push(s)
i+=9
#
This method populates the passed element with HTML
addScreensTo: (element)->
# We are using the jQuery library from within CS:
@element = $(element)
@element.width(@screens.length*@screenWidth)
for screen in @screens
@element.append(screen.generate())
addIndicatorsTo: (elem)->
#
This method creates the small circular
#
indicators. Also using jQuery
@ul = $(elem)
for screen in @screens
@ul.append('<li>')
@ul.find('li:first').addClass('active');
#
... More methods go here ...
Стадия принимает массив иконок в конструкторе. Затем он
вычисляет, сколько экранов будут необходимы, и создает объект для каждого из
них, передавая ей кусочек массива иконок.
Теперь у нас есть разметка всех этих элементов на странице,
но у нас все еще отсутствуют методы контроля перехода между слайдами. Вы
можете увидеть их ниже (еще часть сцены класс):
To: (screenNum)->
# This method animates
the allScreen div in
#
order to expose the needed screen in #mask
if @element.is(':animated')
return false
#
if this is the first or last screen,
#
run the end of scroll animation
if @currentScreen == screenNum
# Parallel assignment:
[from, to] = ['+=15','-=15']
if @currentScreen != 0
[from, to] = [to, from]
# Tell the user there
aren't any more screens:
@element.animate( { marginLeft : from }, 150 )
.animate( { marginLeft : to
}, 150 )
else
# If everything is ok, animate the transition between the screens.
# The fat arrow => is a function that preserves the context of
"this"
@element.animate( { marginLeft:-screenNum*@screenWidth }, =>
@currentScreen = screenNum )
@ul.find('li').removeClass('active').eq(screenNum).addClass('active');
next:
->
toShow = @currentScreen+1
#
If there is no next screen, show
#
the last one
if toShow == @screens.length
toShow = @screens.length - 1
@goTo(toShow)
previous: ->
toShow = @currentScreen-1
#
If there is no previous screen,
#
show the first one
if toShow == -1
toShow = 0
@goTo(toShow)
Все что нам нужно сделать сейчас, это привязку функции
к document.ready события. Для этого мы будем использовать JQuery.
# This is equivalent to $(function(){}):
$ ->
#
You can skip the comma if it's on the end of a line:
allIcons = [
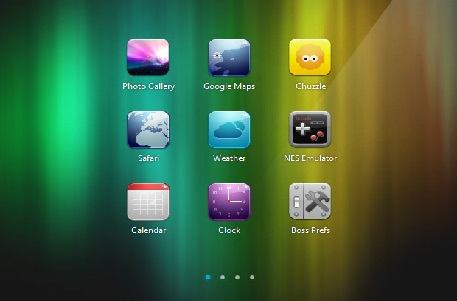
new Icon('Photos', 'Photo Gallery'), new Icon('Maps', 'Google Maps')
new Icon('Chuzzle', 'Chuzzle'), new Icon('Safari', 'Safari')
new Icon('Weather', 'Weather'), new Icon('nes', 'NES Emulator')
new Icon('Calendar', 'Calendar'), new Icon('Clock', 'Clock')
new Icon('BossPrefs', 'Boss Prefs'), new Icon('Chess', 'Chess')
new Icon('Mail', 'Mail'), new Icon('Phone', 'Phone')
new Icon('SMS', 'SMS Center'), new Icon('Camera', 'Camera')
new Icon('iPod', 'iPod'), new Icon('Calculator', 'Calculator')
new Icon('Music', 'Music'), new Icon('Poof', 'Poof')
new Icon('Settings', 'Settings'), new Icon('YouTube', 'Youtube')
new Icon('psx4all', 'PSx4All'), new Icon('VideoRecorder', 'Record
Video')
new Icon('Installer', 'Installer'), new Icon('Notes', 'Notes')
new Icon('RagingThunder', 'RagingThunder'), new Icon('Stocks', 'Stocks')
new Icon('genesis4iphone', 'Genesis'), new Icon('snes4iphone', 'SNES
Emulator')
new Icon('Calendar', 'Calendar'), new Icon('Clock', 'Clock')
new Icon('Photos', 'Photo Gallery'), new Icon('Maps', 'Google Maps')
]
dockIcons = [
new DockIcon('Camera', 'Camera')
new DockIcon('iPod', 'iPod')
new DockIcon('Calculator', 'Calculator')
]
allScreens = $('#allScreens')
# Using the Touchable plugin to listen for
#
touch based events:
allScreens.Touchable();
#
Creating a new stage object
stage
= new Stage(allIcons)
stage.addScreensTo(allScreens)
stage.addIndicatorsTo('#indicators')
#
Listening for the touchablemove event.
#
Notice the callback function. Braces on
#
function calls are optional
allScreens.bind 'touchablemove', (e,touch)->
stage.next() if touch.currentDelta.x < -5
stage.previous() if touch.currentDelta.x > 5
#
Adding the dock icons:
dock
= $('#dock')
for
icon in dockIcons
dock.append(icon.markup)
Touchable методом мы расширяем элемент поддержки нескольких
касаний на основе событий. Среди них touchablemove ,
который выполняется, когда пользователь перемещает пальцем по экрану.Он также реагирует,
когда мы делаем это с помощью мыши. Дальше, когда мы привязываем к этому
событию, мы получаем сенсорный объект в качестве второго
аргумента функции обратного вызова. Она проводит дельты, или разность, с
начала движения.
Заключение
CoffeeScript интересный язык, который может сделать
разработку в браузере проще. С ним вы напишите до 50% меньше кода по
сравнению с чистым JavaScript.
Ссылка на источник
|